
Anthology Instructions: Student Teaching
Logging into the System
You can log into the system directly via this link: https://wcupa.chalkandwire.com/Login.aspx
- Click on “Sign in with your school ID”.
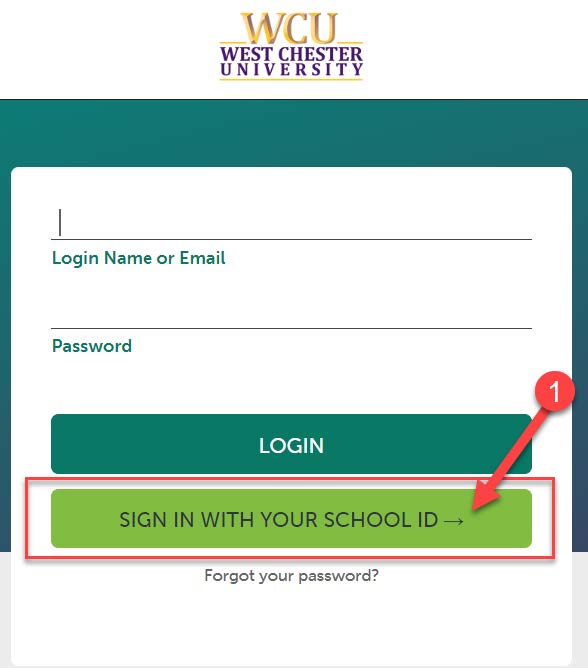
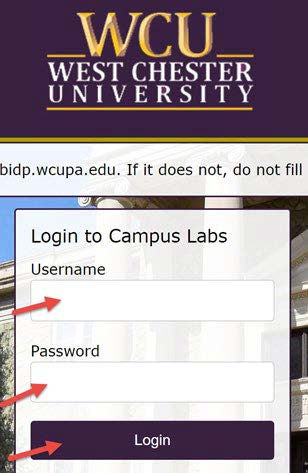
- Then you will be prompted to log in with your WCU log in credentials (the same username
and password that you use for D2L, email, RamPortal, etc.)
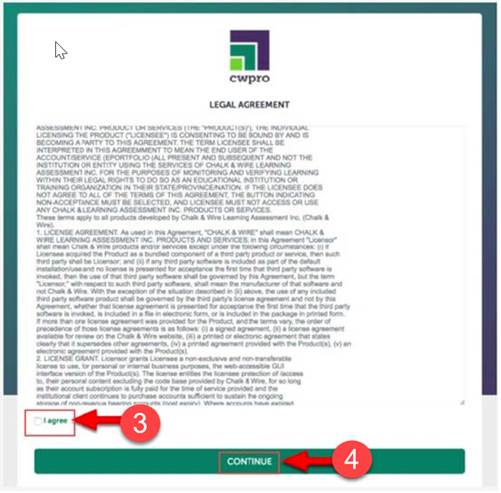
- Your first time logging in to the system, you will need to read and accept the legal agreement for using Anthology Portfolio. Once you have read the agreement, select “I agree.”
- Then, click “Continue.” You will only have to do this once on your first-time logging
into the system.
Viewing Your Student Teaching Placements
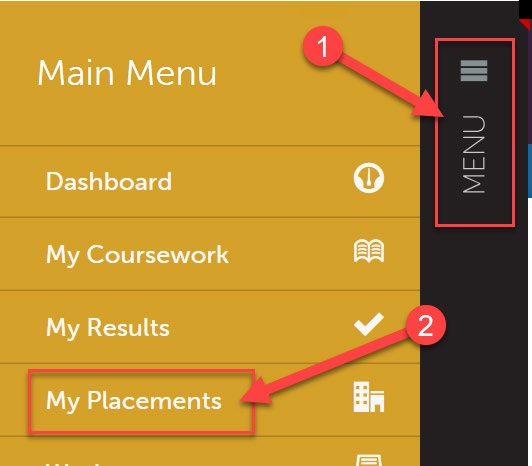
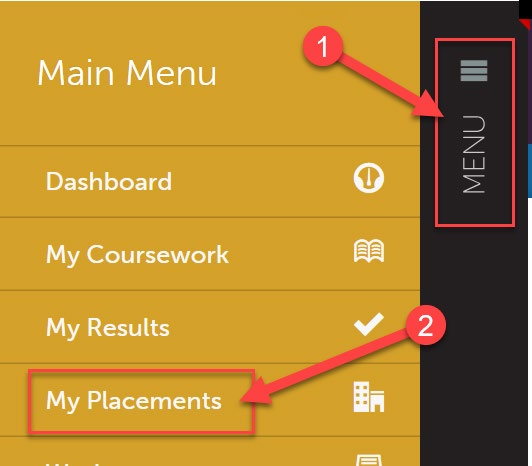
- Click on the “Menu” tab on the left side.
- Click on “My Placements”.
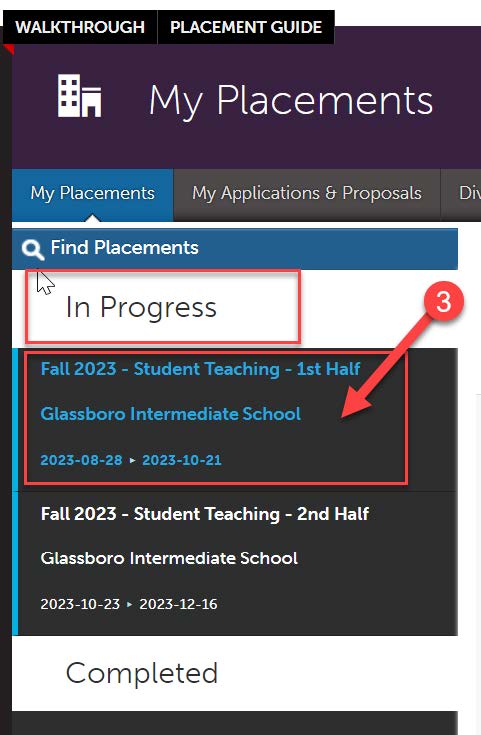
- On the left side of the placement screen, you will see a list of all placements that
you’ve ever had in the Anthology system. Your current student teaching placement(s)
will be under “In Progress”. Click on the placement that you wish to view.
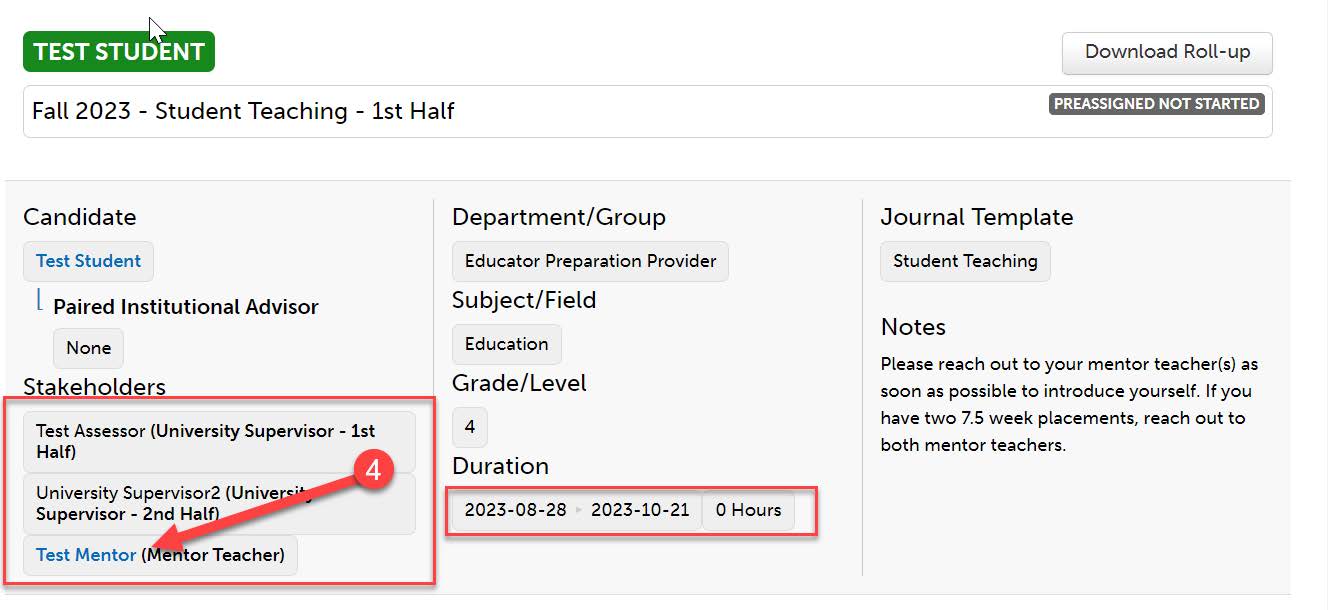
- In the placement, you will be able to view your University Supervisors’ names, your
Mentor Teacher’s name, and the dates of your placement. To obtain your Mentor Teacher’s
email address, click on their name.
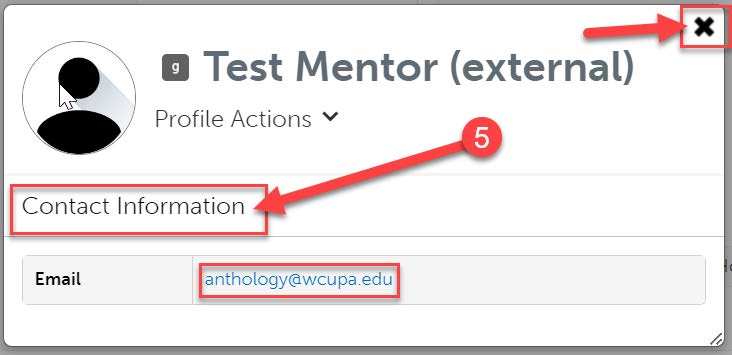
- Then, click “Contact Information”. You can click directly on their email address which
will open a blank email, or you can copy and paste the email address for your use.
Click the X when you are done.
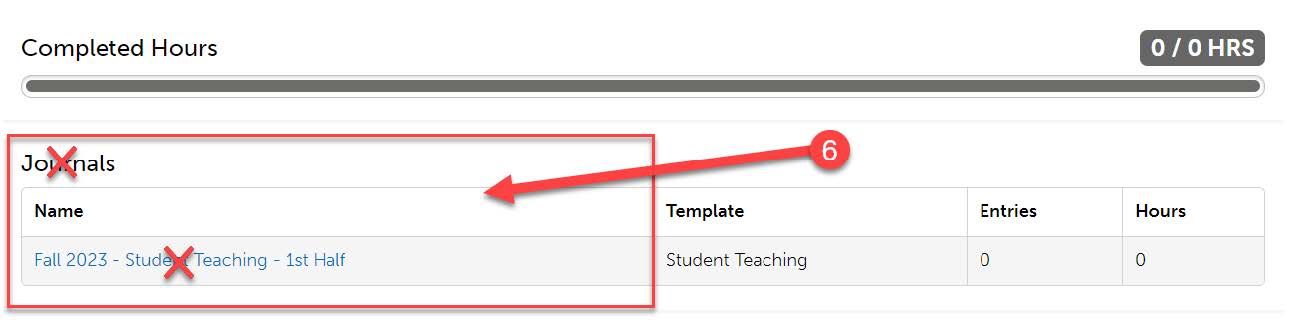
- Scroll down a bit, and you will notice a section titled “Journals”. You do NOT have
to do anything here. This is a placeholder, and you do not need to worry about completing
anything.
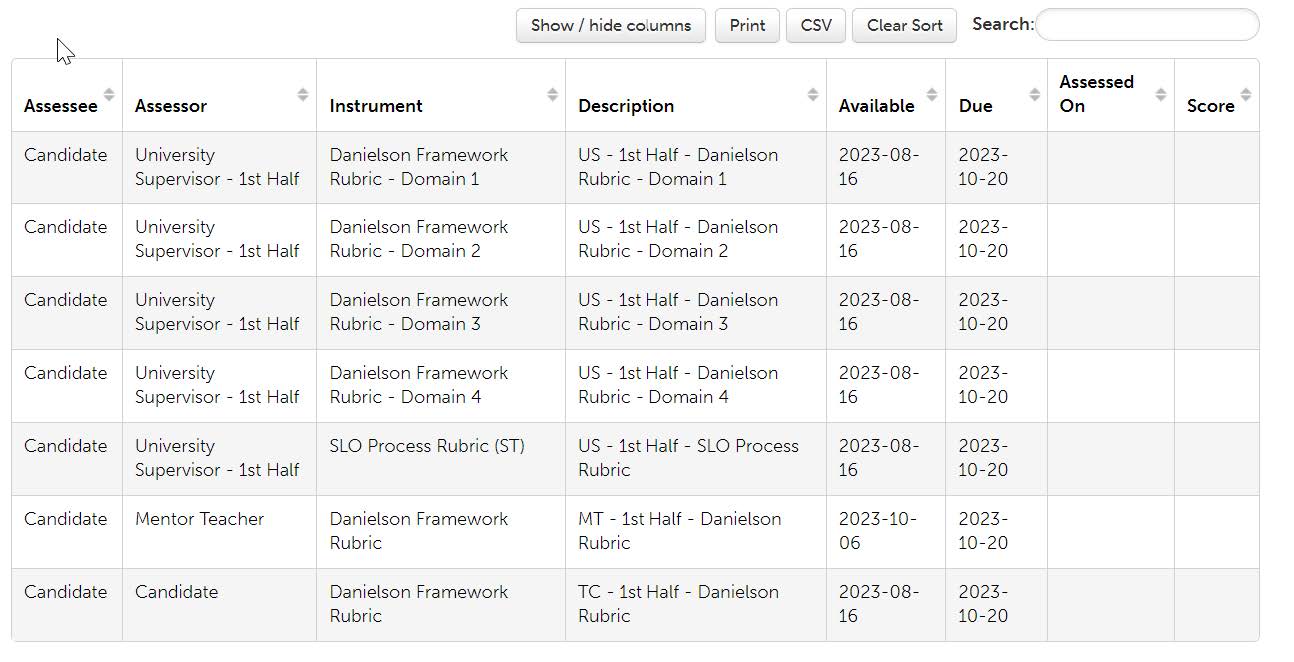
- Further down, you will see a grid containing a list of Assessments. These are all
the assessments that will take place during that student teaching placement. Please
note that most of these assessments will take place during both 1st half and 2nd half.
Further instructions on this are included in the “Completing your Student Teaching
Requirements” section of this document.
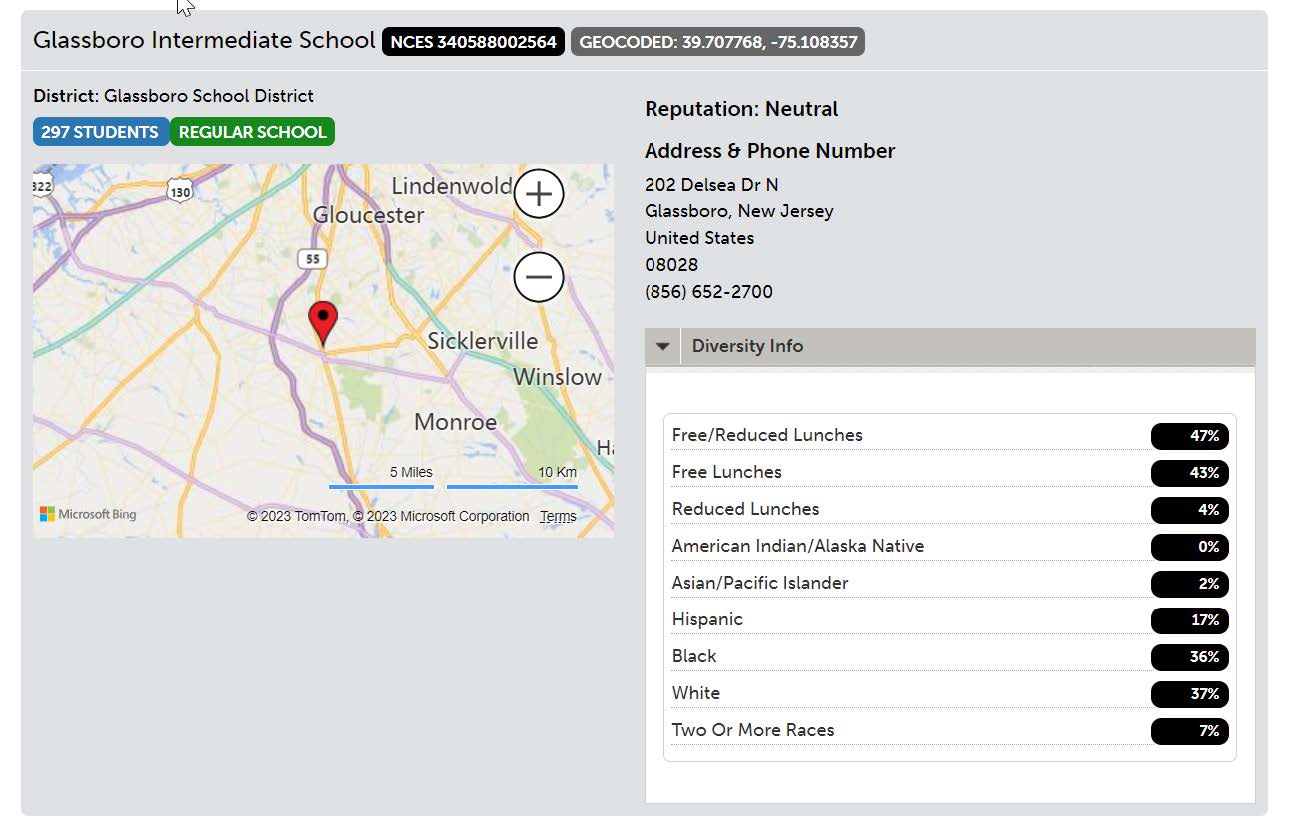
- Finally, at the very bottom of the placement, you can view information on your placement
school. This includes address, phone number, diversity information, and a map to show
you the location of the school.
Creating Your Student Teaching Portfolios
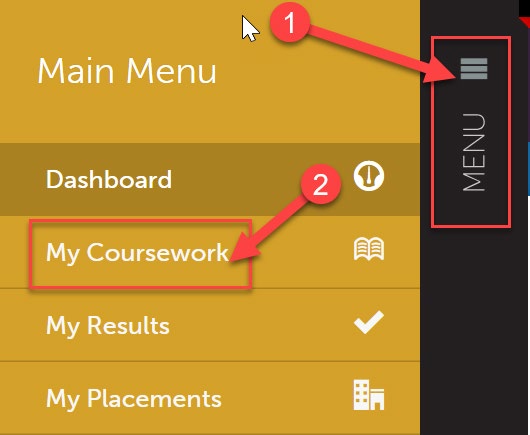
- Click on the “Menu” tab on the left side.
- Click on “My Coursework”.
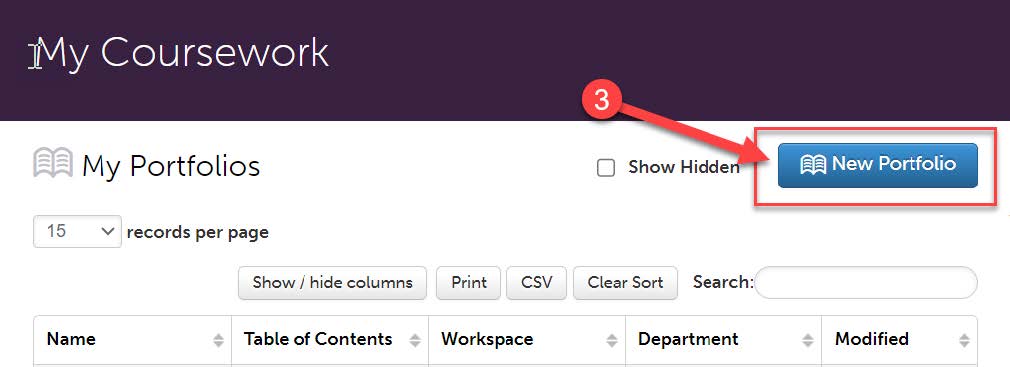
- Click on “New Portfolio”. (You will only have to do this the first time you access
your Student Teaching Portfolios. Once you create them, you can go back and access
them without creating a new one each time. You will have to do this process TWICE
if you are taking 2 halves of student teaching.)
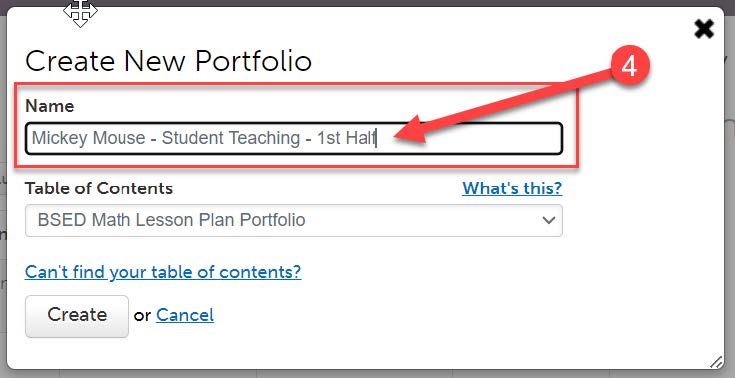
- First, you should name your portfolio. Please name your portfolio using the following
naming convention: “FirstName LastName – Student Teaching – Half”. For example – in
the screen shot below, the student’s name is Mickey Mouse and this is their 1st Half
student teaching portfolio.
- Next, you will need to select the correct portfolio template from the “Table of Contents”
drop down list. Click the drop-down arrow, then scroll through until you find the
portfolio listed for the student teaching course you are currently taking.
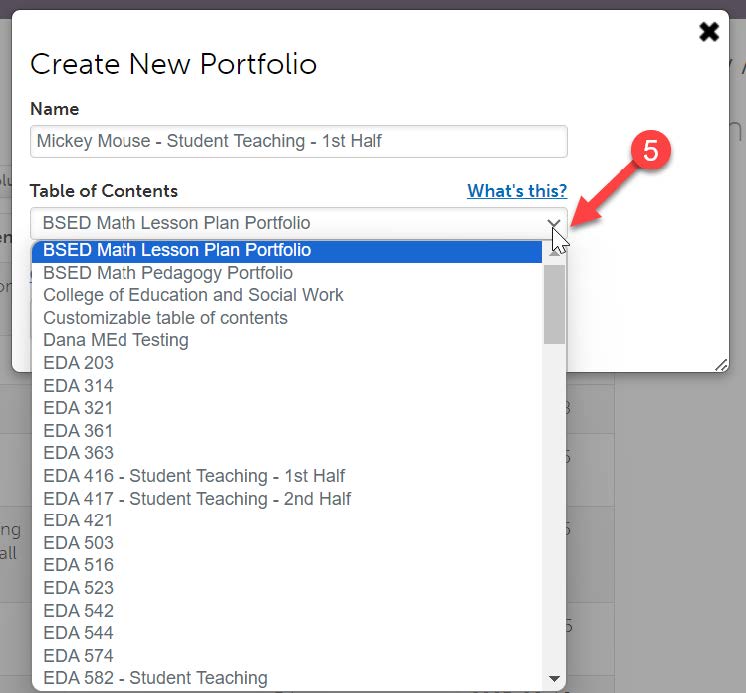
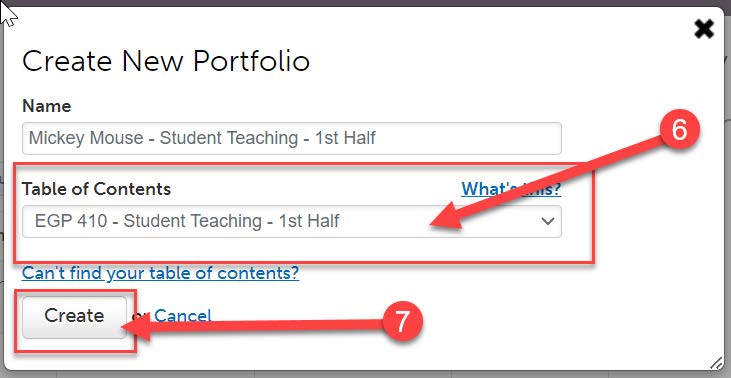
- For example – in the screen shot below, Mickey Mouse is an Early Grades major who is currently taking EGP 410, so they have selected the portfolio template called “EGP 410 – Student Teaching – 1st Half.”
- Once you have named your portfolio and have selected the correct portfolio template,
click “Create”.
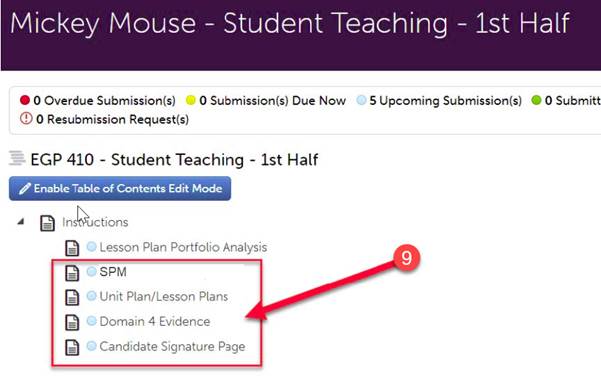
- Now you will see the contents of your portfolio. Please note that the portfolios for
each program are slightly different and may have additional assignments in them. However,
all programs will have the following tabs:
- SPM
- Unit Plan/Lesson Plans
- Domain 4 Evidence
- Candidate Signature Page
- Further instructions on completing these items is located in the “Completing your
Student Teaching Requirements” section of this document.
- Repeat steps 1-7 to create your 2nd half student teaching portfolio. (If you are taking 2 halves of student teaching.)
Completing Your Student Teaching Requirements
Danielson Self-Evaluation
- You will need to complete the Danielson Self Evaluation in BOTH halves of student teaching. This will be located in your placement in both halves. Click the “Menu” tab on the left side.
- Click on “My Placements”.
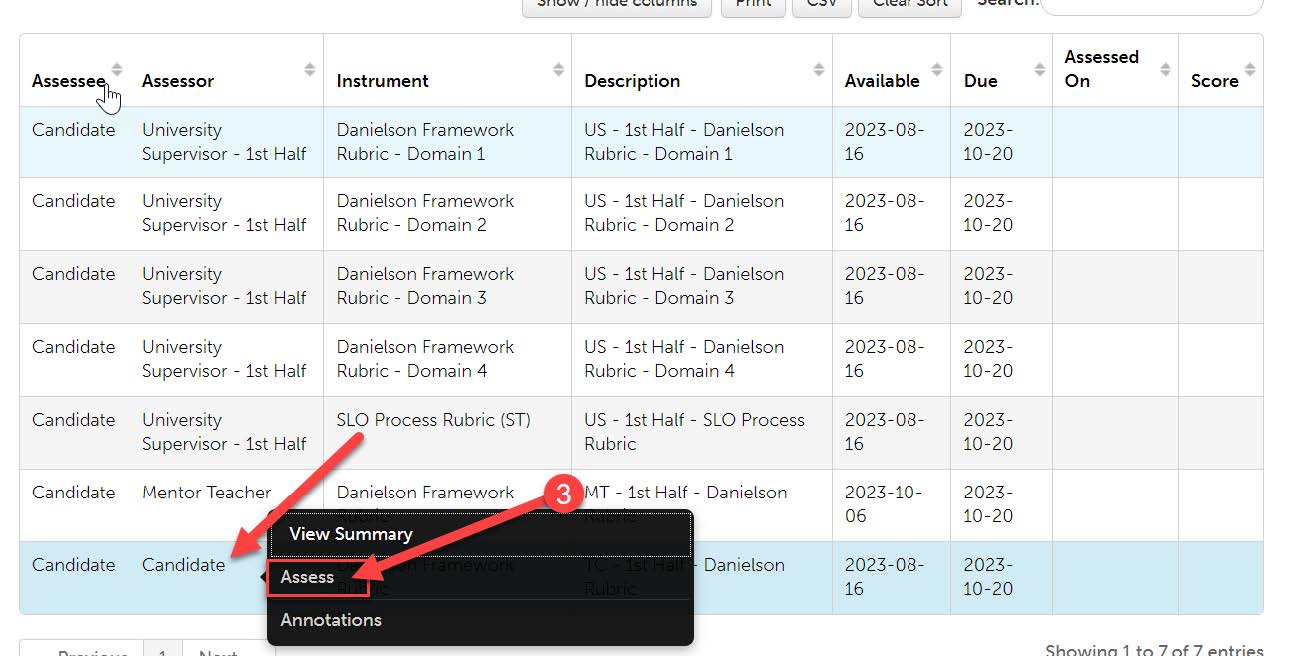
- Make sure you are in the placement that you wish to complete your self-evaluation
for. Scroll to the section of the placement that lists all the assessments. The only
assessment that you need to complete is the one that lists “Candidate” in the “Assessor”
column. This is the self-evaluation. You will be using the Danielson Framework rubric
to assess yourself. To complete this, first, click on that row. Then, when a menu
appears, click “Assess”.
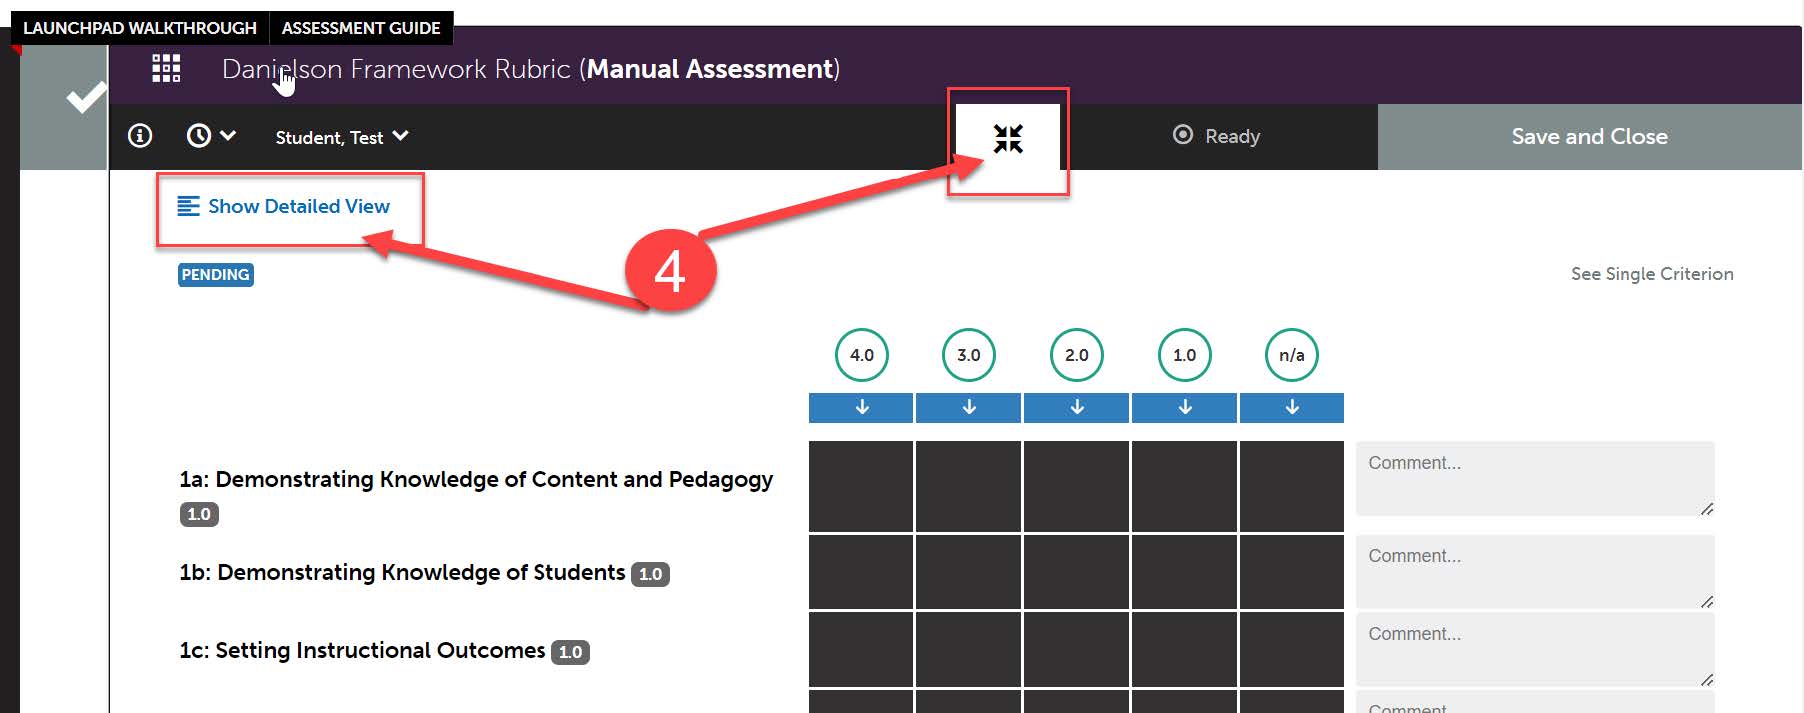
- This will open the Danielson Rubric. You have a few options on how you would like
to view the rubric. The screen shot below shows the rubric as is. In this view, you
can hover your mouse over any rubric option to show the detailed explanation of that
performance level. You can click on “Show Detailed View” which will show the descriptions
for each performance level. You can click on the 4 arrows icon to show one rubric
item at a time. It is up to you how you are most comfortable viewing the rubric.
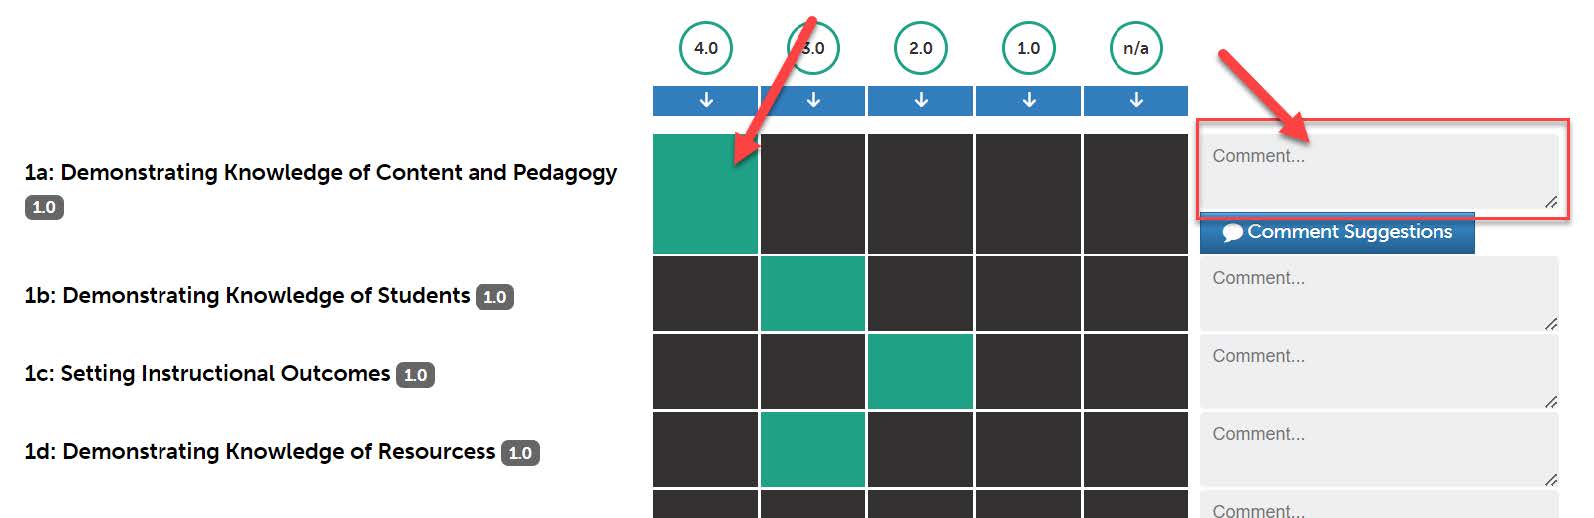
- Once you are comfortable with your view, you can begin to score the rubric. Click
on the performance level you would like to select for each criterion. Once selected,
the box will change to green on the item you selected. You can add comments to each
criterion if you wish, but it is not required.
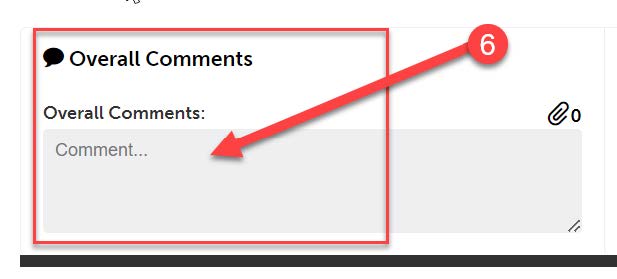
- Complete the entire rubric. At the very bottom, there is an “Overall Comments” box
if you wish to leave a comment. Once you are done, scroll all the way back to the
top of the rubric.
- If you want to save your work and come back to it at a later time, click “Save as
Draft”. If you are finished with the rubric and are ready to submit it, click “Save”.

- Once you have clicked “Save,” you are finished with the evaluation. Back in your placement,
the row for this assessment will now show the date it was completed and the mean score.

- You will complete this assessment during both halves.
Unit Plan/Lesson Plans
- Click on the “Menu” tab on the left side.
- Click on “My Coursework”.
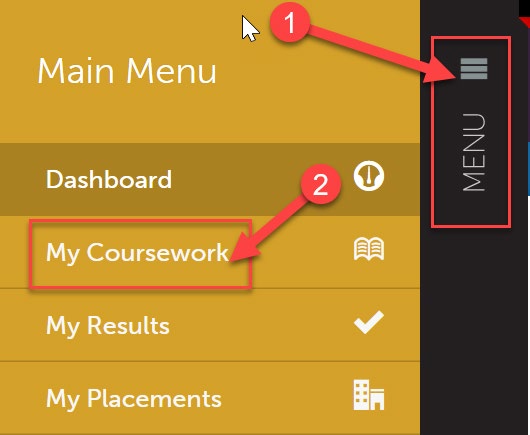
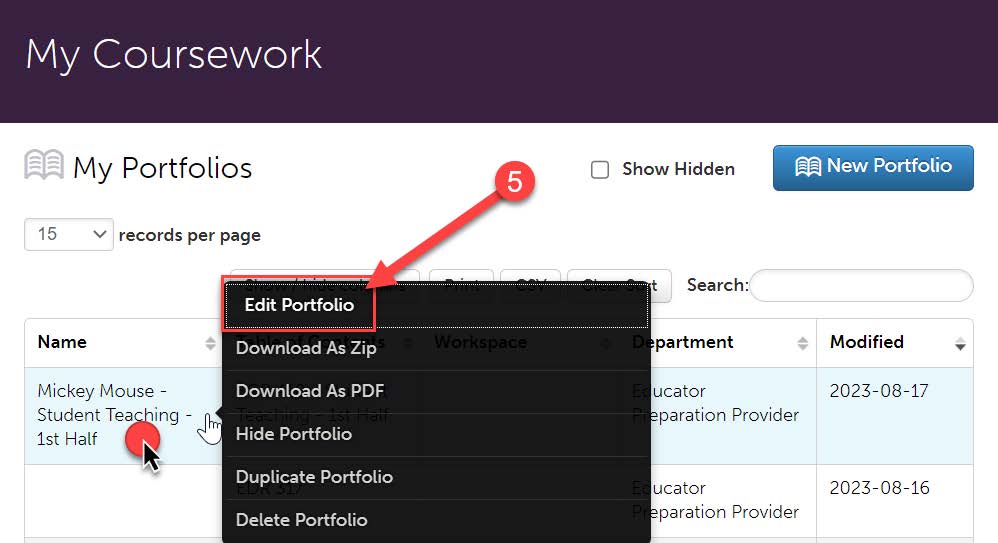
- Locate your student teaching portfolio that you created. You should have one for each half.
- Depending on your program, you may only have to complete the Unit Plan/Lesson Plans tab in one half. Please check with your University Supervisor to confirm the requirements for your program. If you are not completing this tab in both halves, for whichever half you are not completing it, this tab can be left blank in that portfolio and does not need to be submitted.
- To submit this assignment, click on the name of the portfolio for the half which you
wish to submit it to. When the menu pops up, click “Edit Portfolio”.
- Then, click on the “Unit Plan/Lesson Plans” tab.
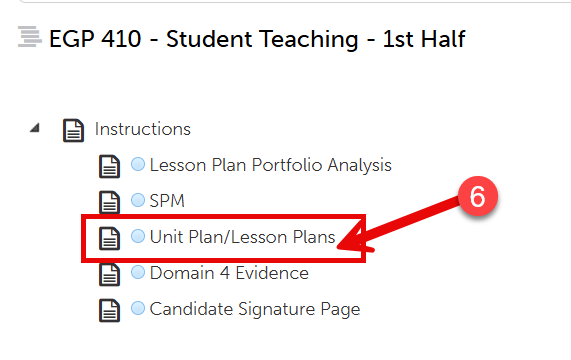
- Read and follow the instructions to complete the assignment. When your assignment is complete, click on “Add Content”.
- Then, click “Add File”.
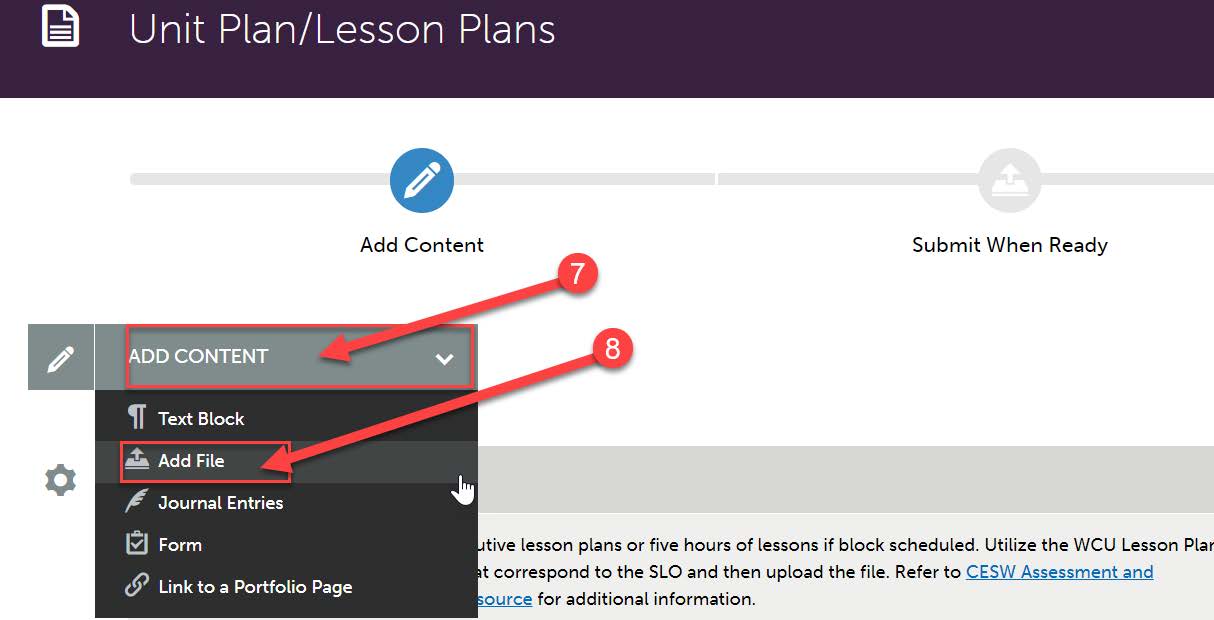
- Then, click “Insert Content Here” below the instructions.
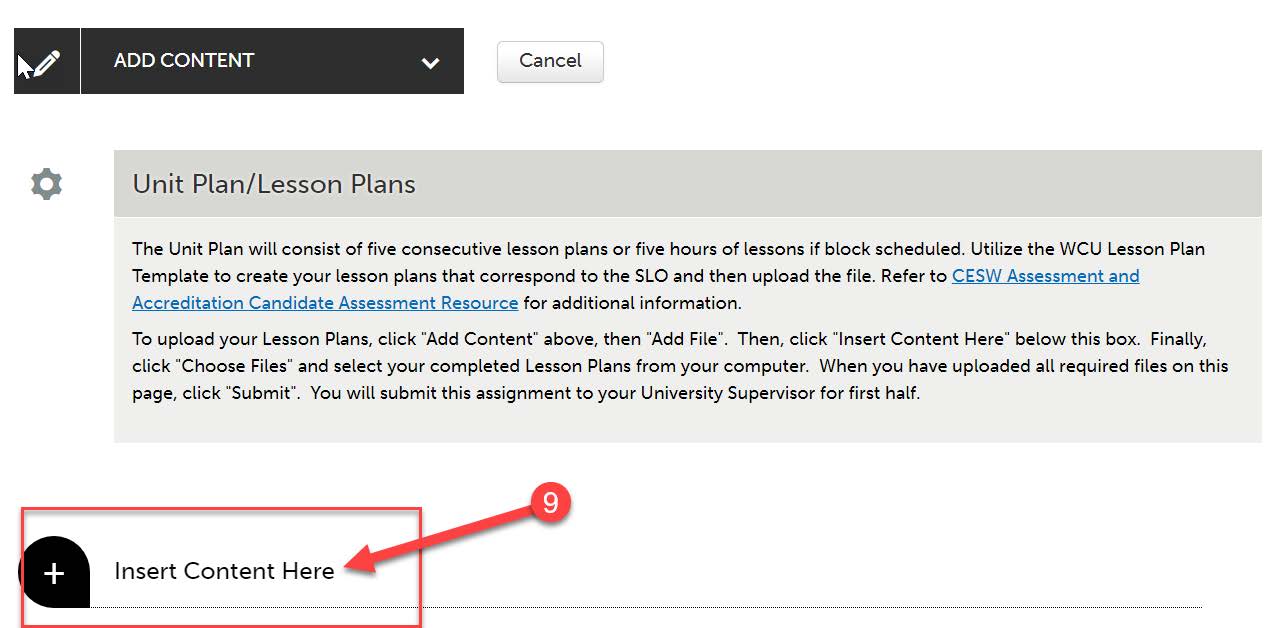
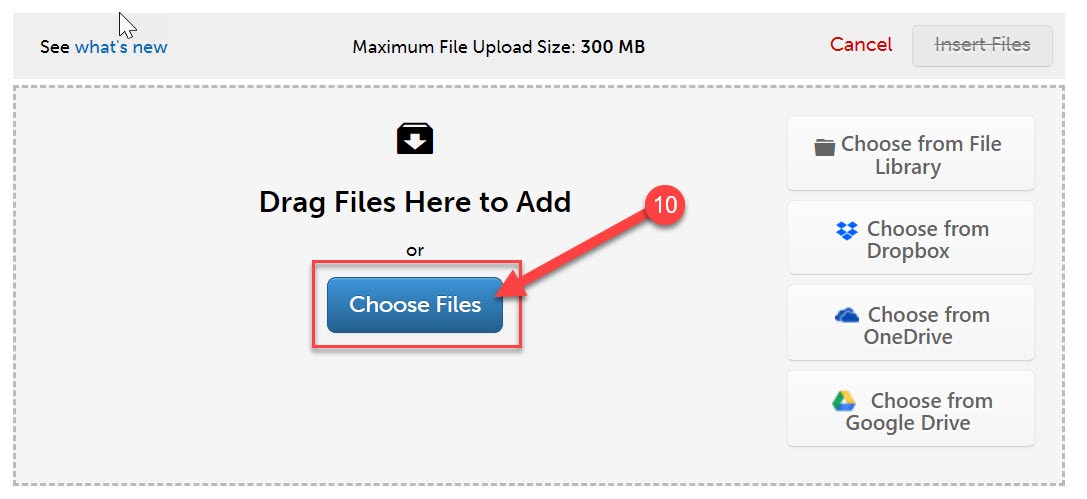
- Click “Choose Files.” Then, select the file(s) from your computer. You can upload
multiple files if necessary.
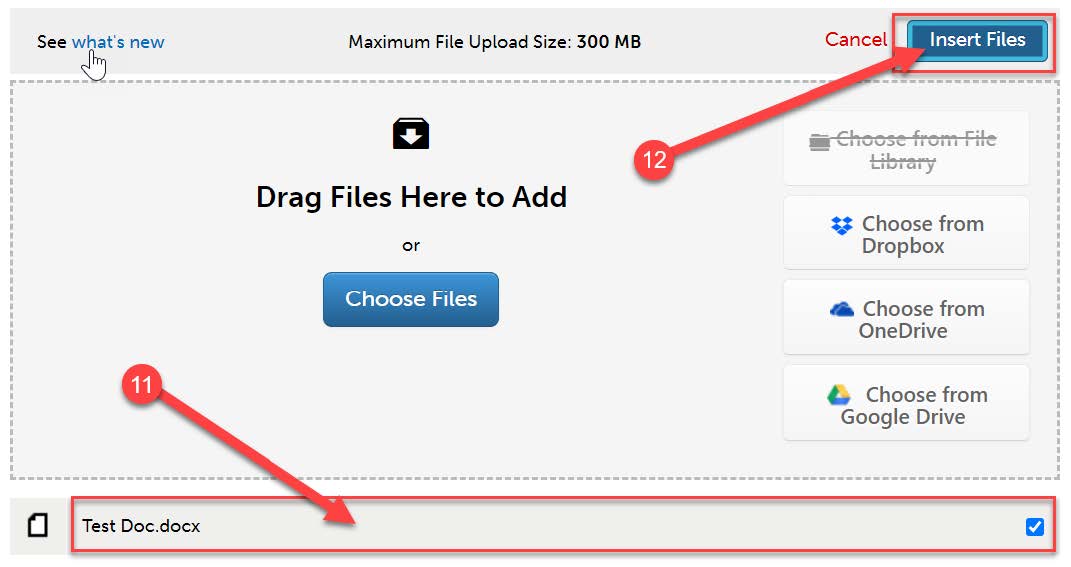
- When the file is uploaded, it will appear below with a blue check mark next to it.
- Then, click “Insert Files”
- Once you have uploaded the required file(s) on this page, you are ready to submit
the “Unit Plan/Lesson Plans” tab. Click “Submit” at the top of the page.
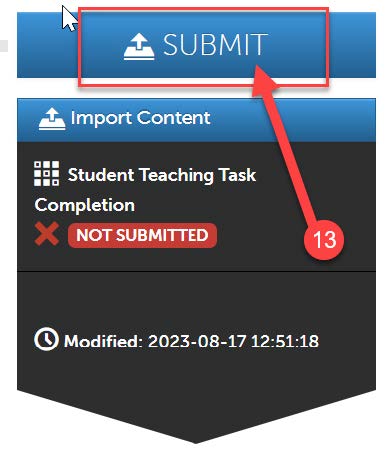
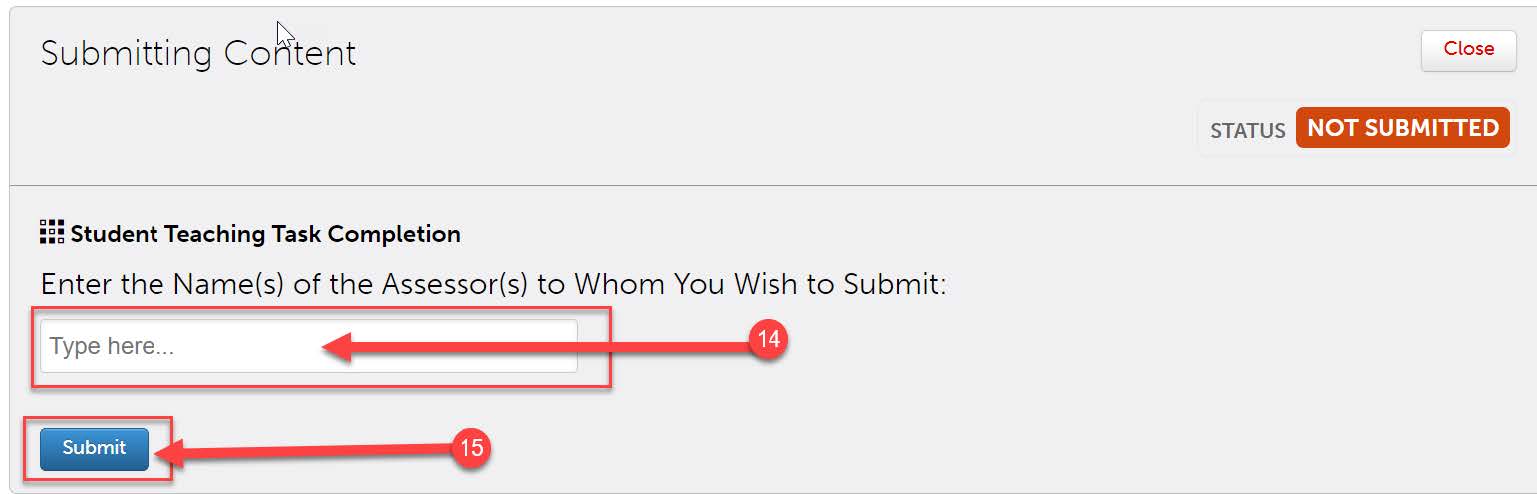
- Next, you will need to enter the name of your University Supervisor so that your assignment will be submitted to them to assess. Begin typing the name of your supervisor. As you type, matches in the system will appear. When the correct name appears, click on it to select it. The name will appear next to a checkmark to indicate that it has been selected.
- Click the “Submit” button”.
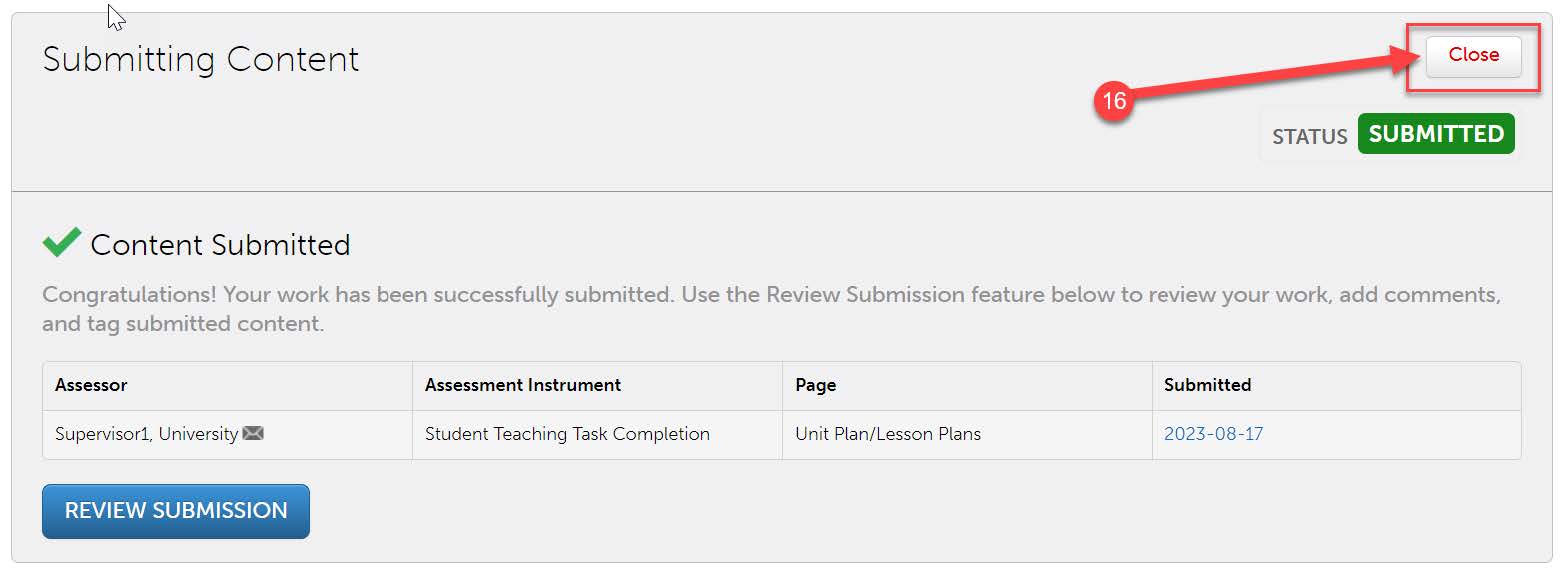
- Then, click “Close”.
- Navigate back to your student teaching portfolio to complete the next requirement.
SPM
- Depending on your program, you may only have to complete the Unit Plan/Lesson Plans tab in one half. Please check with your University Supervisor to confirm the requirements for your program. If you are not completing this tab in both halves, for whichever half you are not completing it, this tab can be left blank in that portfolio and does not need to be submitted.
- Click on the “SPM” tab in your portfolio.
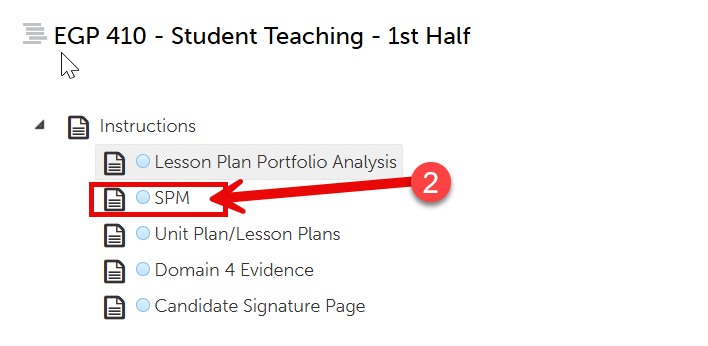
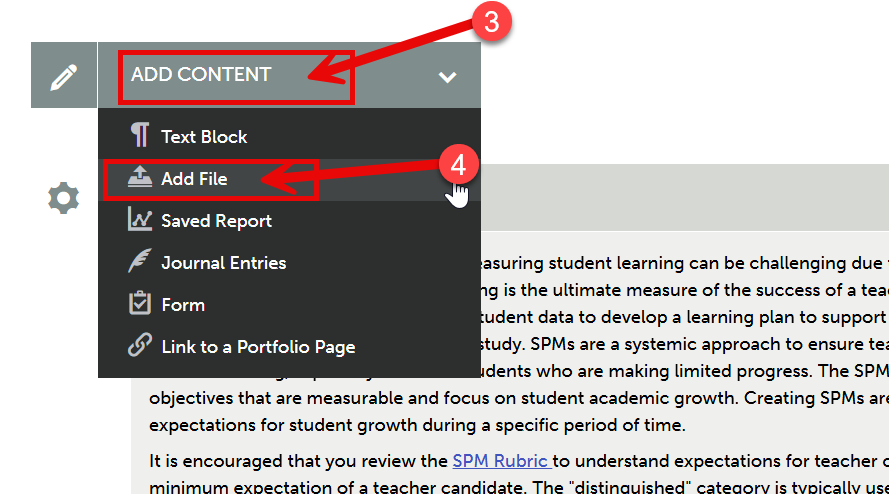
- You will need to upload your SPM template. Click on “Add Content”.
- Then, click “Add File”.
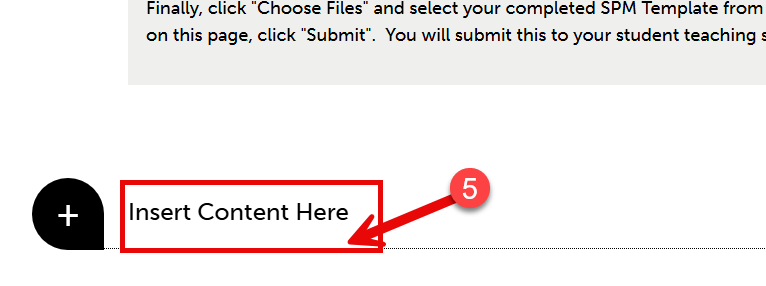
- Then, click “Insert Content Here” below the instructions.
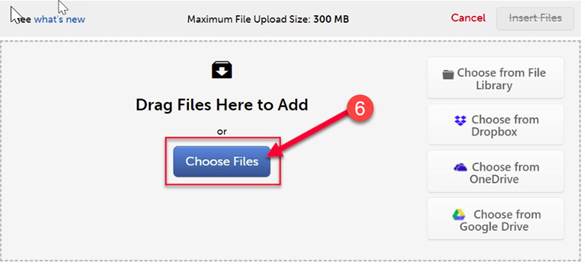
- Click “Choose Files.” Then, select the file(s) from your computer. You can upload
multiple files if necessary.
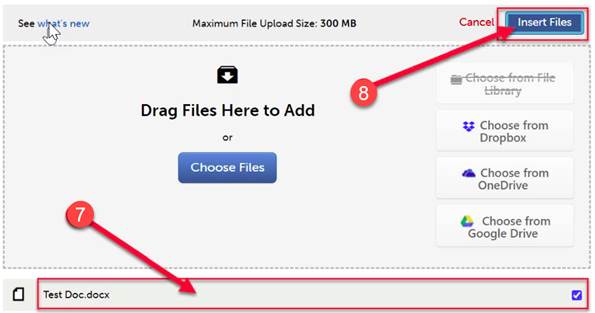
- When the file is uploaded, it will appear below with a blue check mark next to it.
- Then, click “Insert Files”
- Once you have completed the SPM form and uploaded your files, you are ready to submit
the “SPM” tab. Click “Submit” at the top of the page.
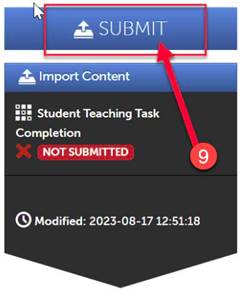
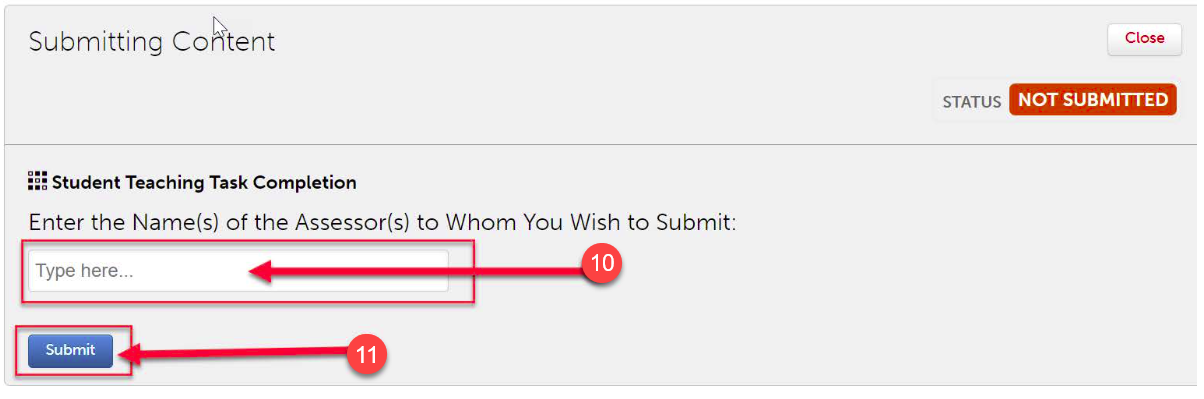
- Next, you will need to enter the name of your University Supervisor so that your assignment will be submitted to them to assess. Begin typing the name of your supervisor. As you type, matches in the system will appear. When the correct name appears, click on it to select it. The name will appear next to a checkmark to indicate that it has been selected.
- Click the “Submit” button”.
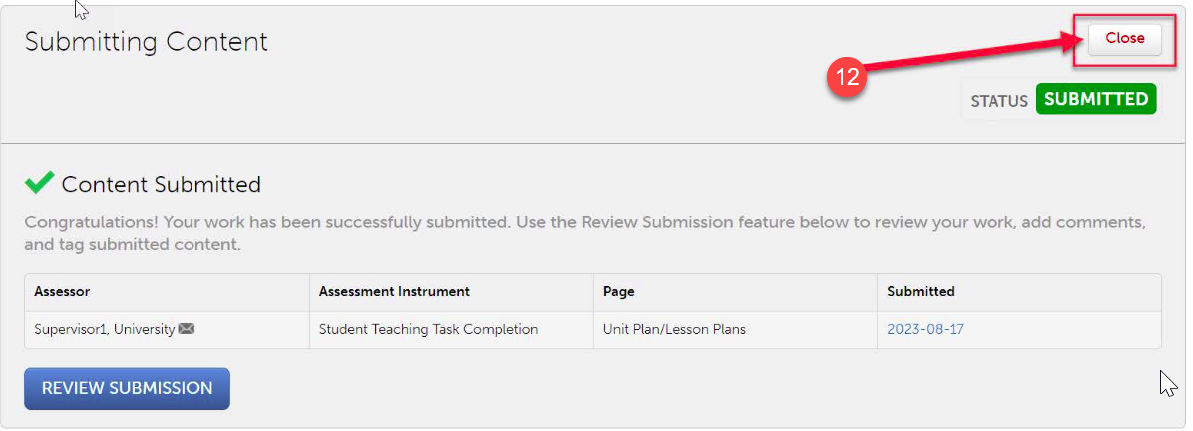
- Then, click “Close”.
- Navigate back to your student teaching portfolio to complete the next requirement.
Domain 4 Evidence
- Depending on your program, you may only have to complete the Domain 4 Evidence tab in one half. Please check with your University Supervisor to confirm the requirements for your program. If you are not completing this tab in both halves, for whichever half you are not completing it, this tab can be left blank in that portfolio and does not need to be submitted.
- Click on the “Domain 4 Evidence” tab in your portfolio.
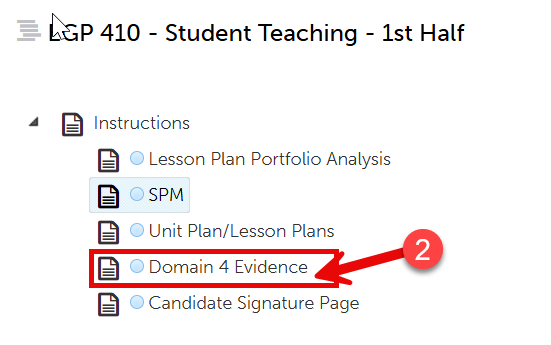
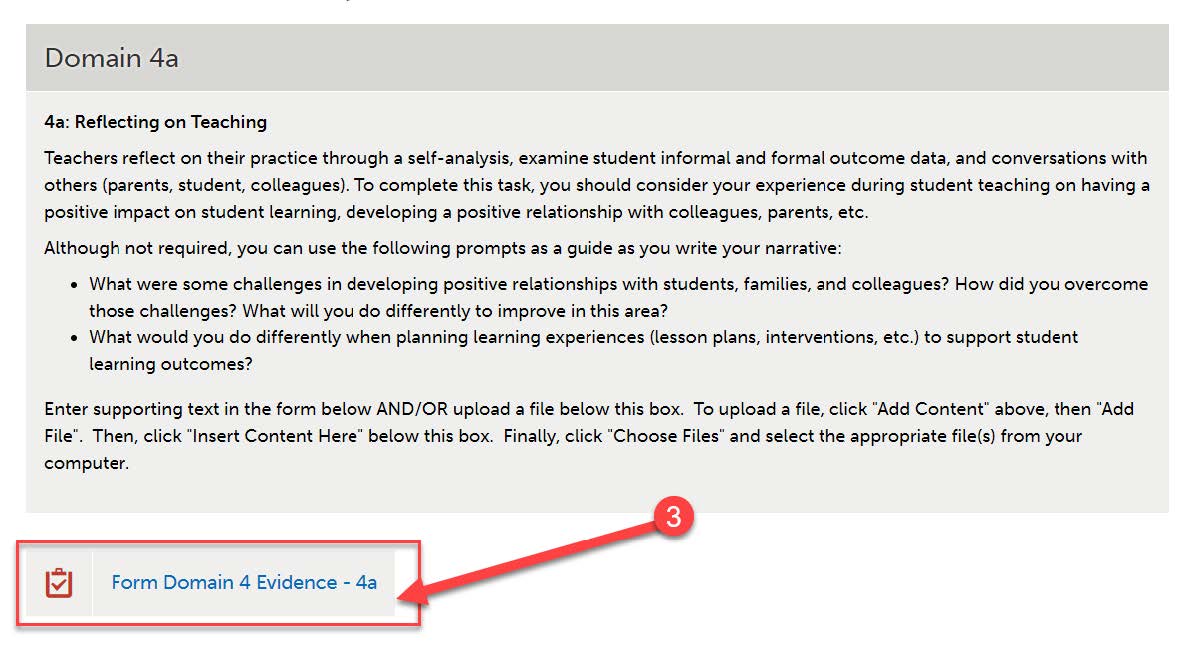
- Read and follow the instructions to complete the assignment. In the Domain 4 Evidence
tab, there is a section for each sub-domain. You have the choice to fill out the form, upload evidence in the form
of a file, or both, for each sub-domain. The form is located below the assignment
instructions for each sub-domain. If you will be using the form, click on the name
of the form to complete it.
- Complete the form. When you are done, click the green “Save” button at the bottom.
Then click “Close Form”.
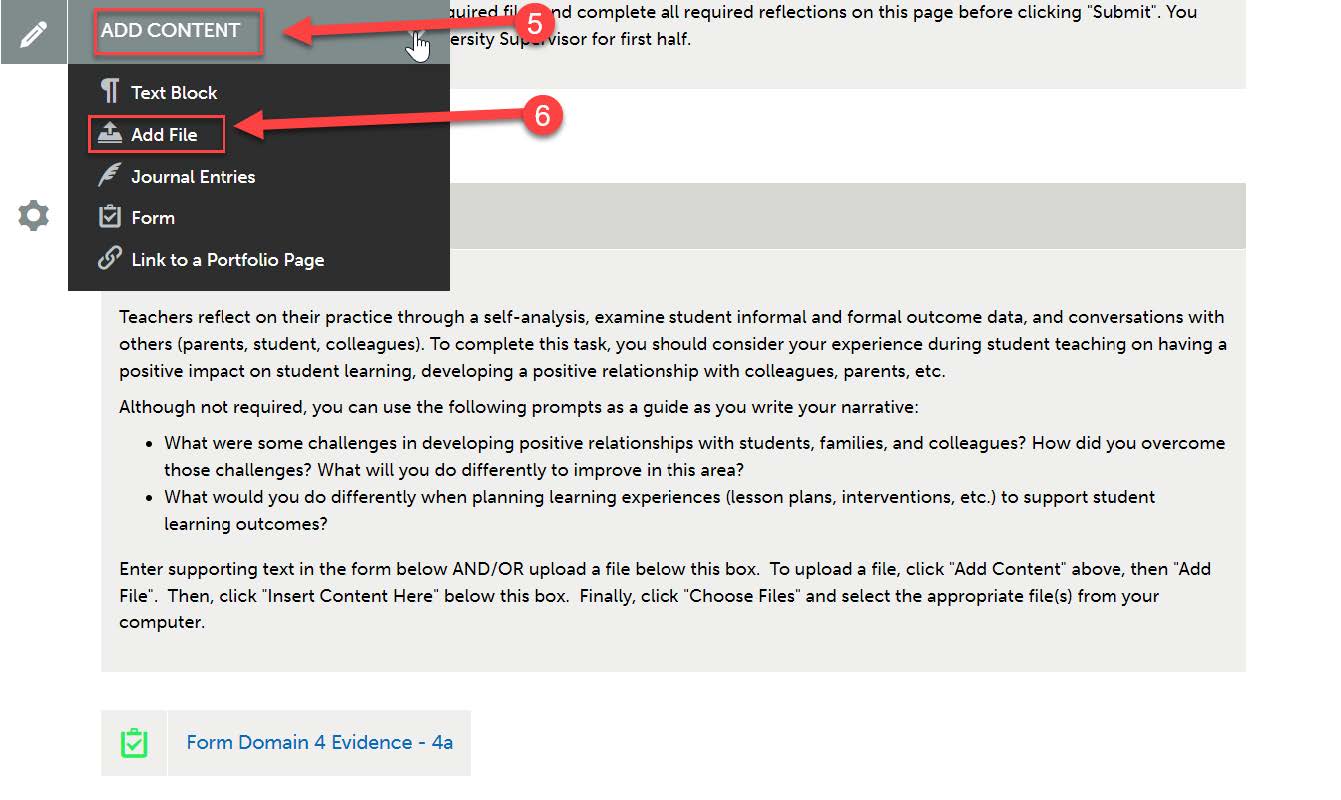
- Next, if you wish to upload a file, click on “Add Content”.
- Then, click “Add File”.
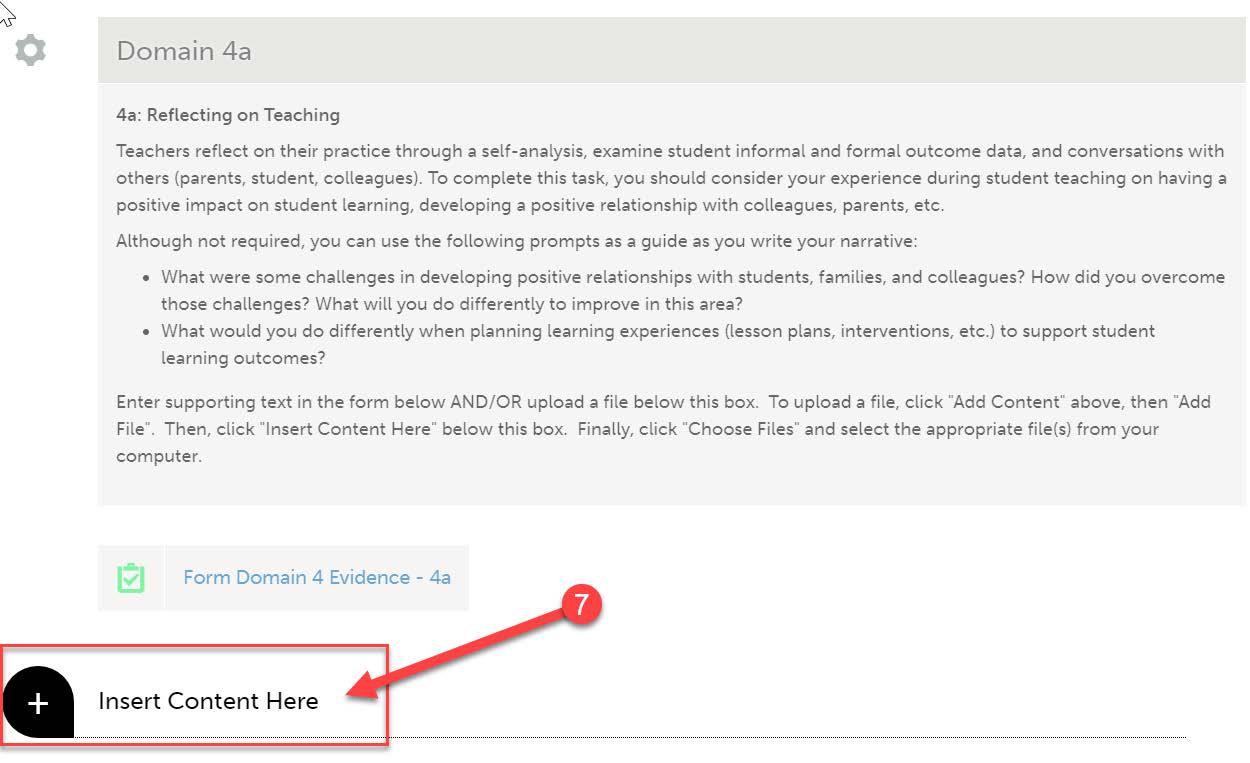
- Then, click “Insert Content Here” below the instructions and form for the correct
sub-domain.
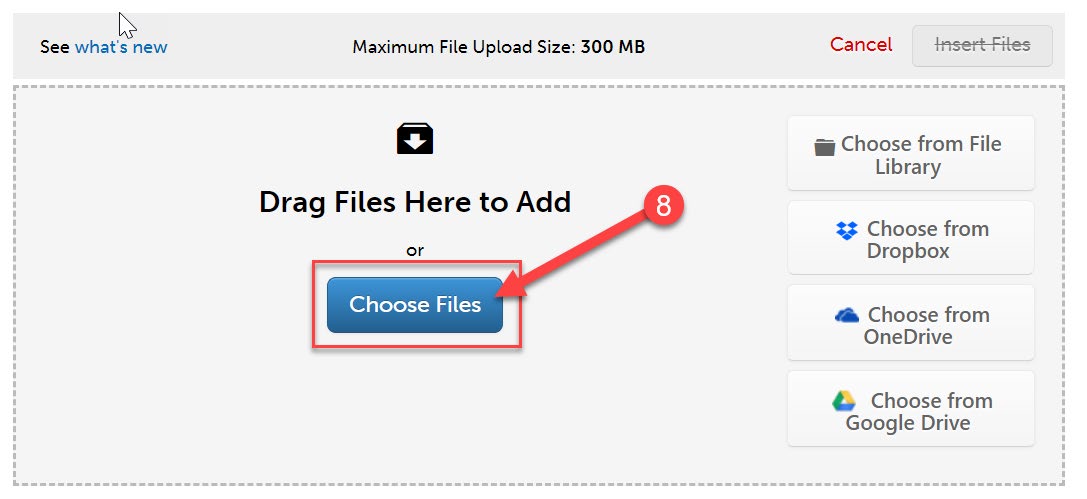
- Click “Choose Files.” Then, select the file(s) from your computer. You can upload
multiple files if necessary.
- When the file is uploaded, it will appear below with a blue check mark next to it.
- Then, click “Insert Files”
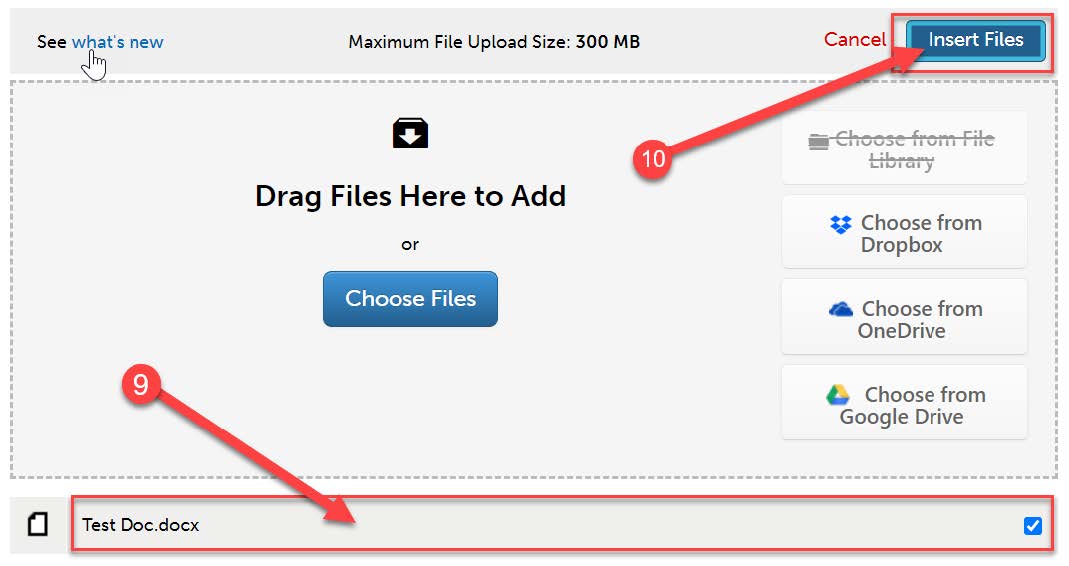
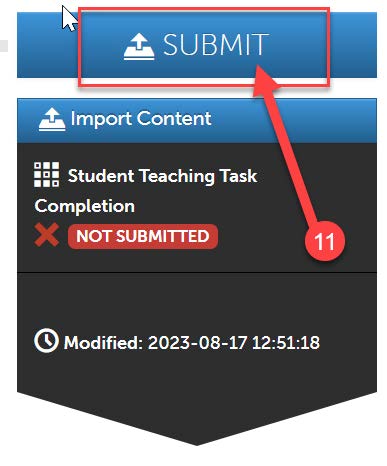
- Repeat steps 4-10 for each sub-domain. Once you have completed the form and/or file upload for each sub-domain of Domain 4, you are ready to submit the “Domain 4 Evidence” tab. Click
“Submit” at the top of the page.
- Next, you will need to enter the name of your University Supervisor so that your assignment will be submitted to them to assess. Begin typing the name of your supervisor. As you type, matches in the system will appear. When the correct name appears, click on it to select it. The name will appear next to a checkmark to indicate that it has been selected.
- Click the “Submit” button”.
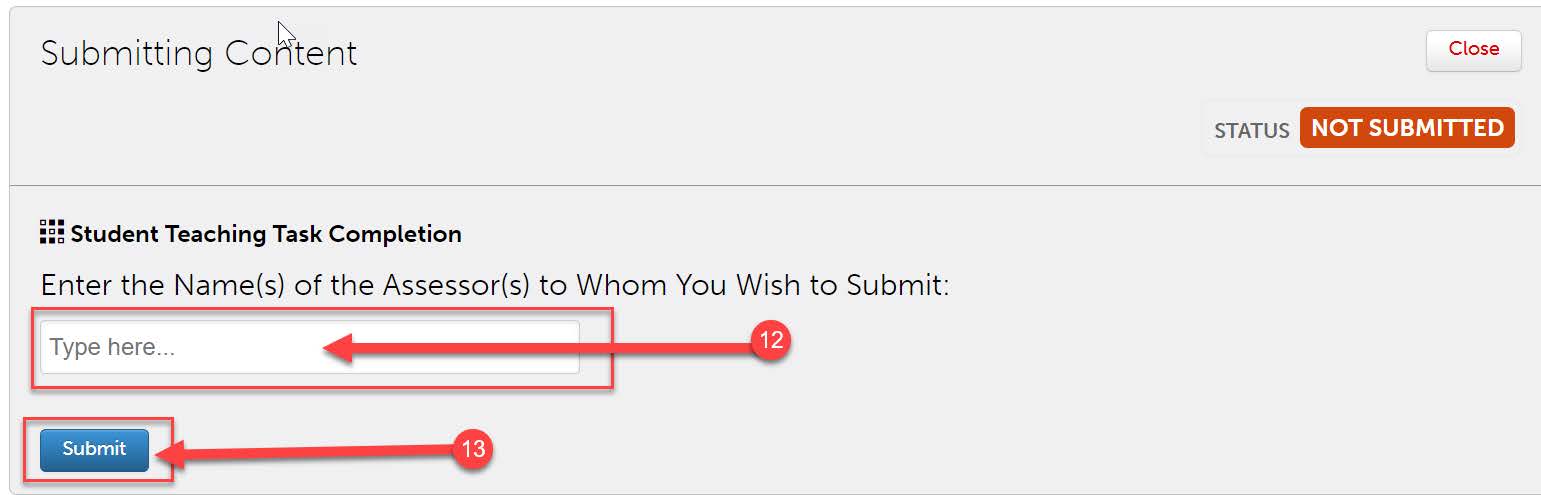
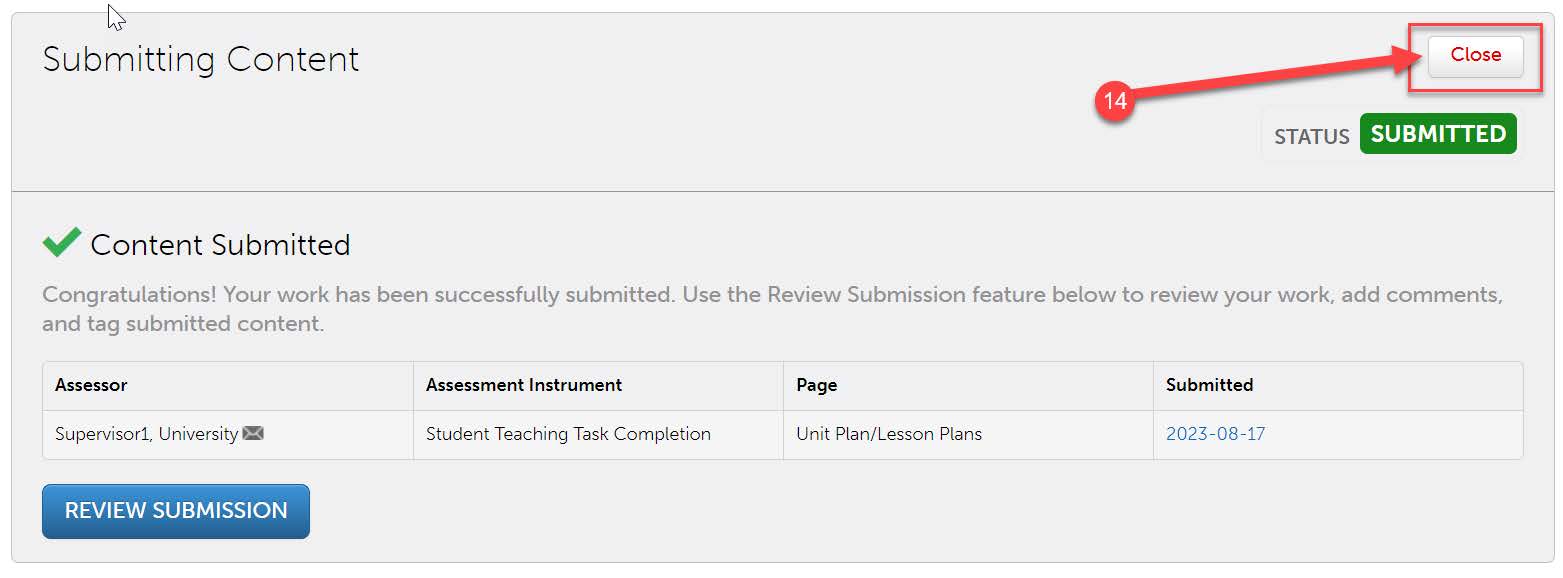
- Then, click “Close”.
- Navigate back to your student teaching portfolio to complete the next requirement.
Candidate Signature Page
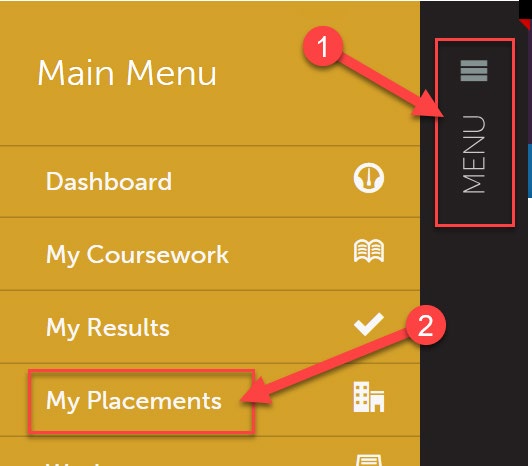
- You are required to complete the “Candidate Signature Page” for BOTH halves of student teaching. Before you sign the “Candidate Signature Page,” you will need to review your assessments in your Student Teaching placement for the half in which you will be signing. To revisit your placement, click the “Menu” tab on the left side.
- Click on “My Placements”.
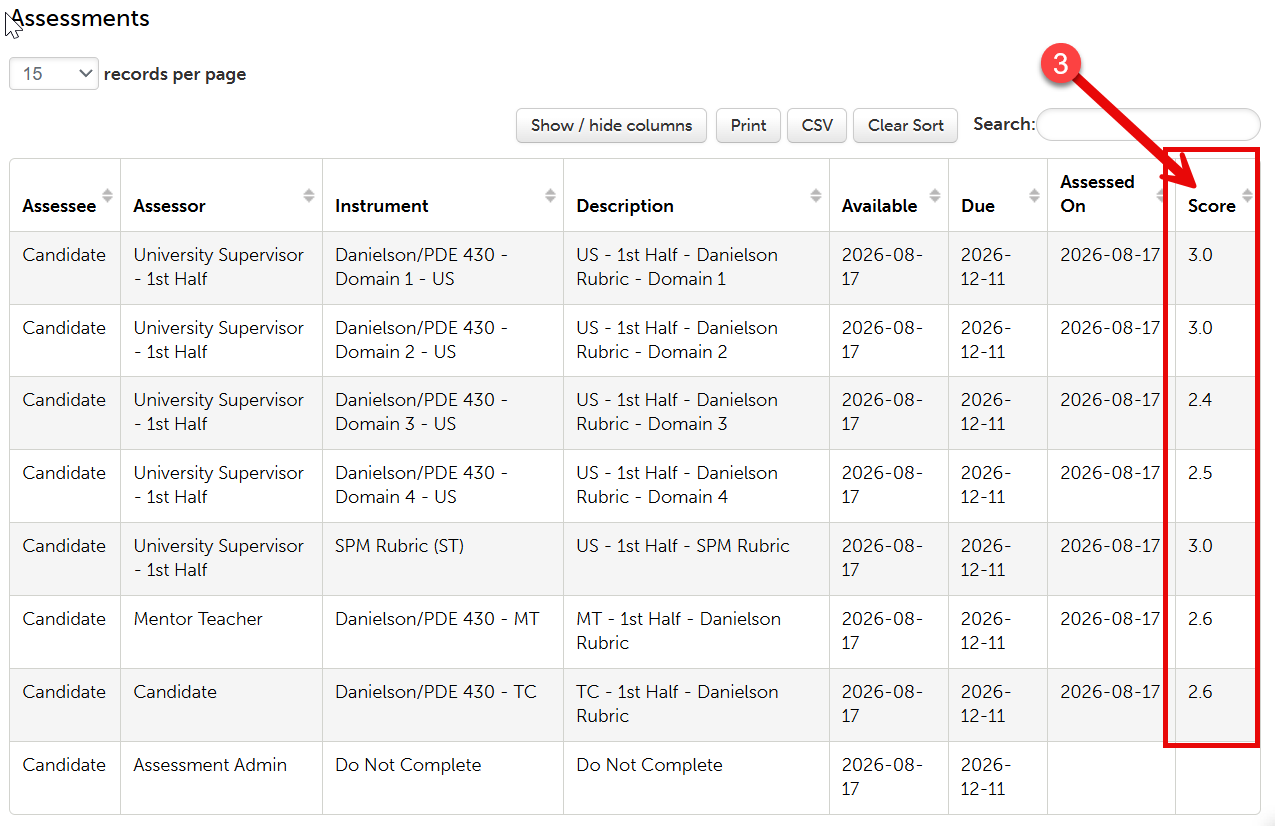
- Make sure you are in the placement that you wish to complete your signature page for.
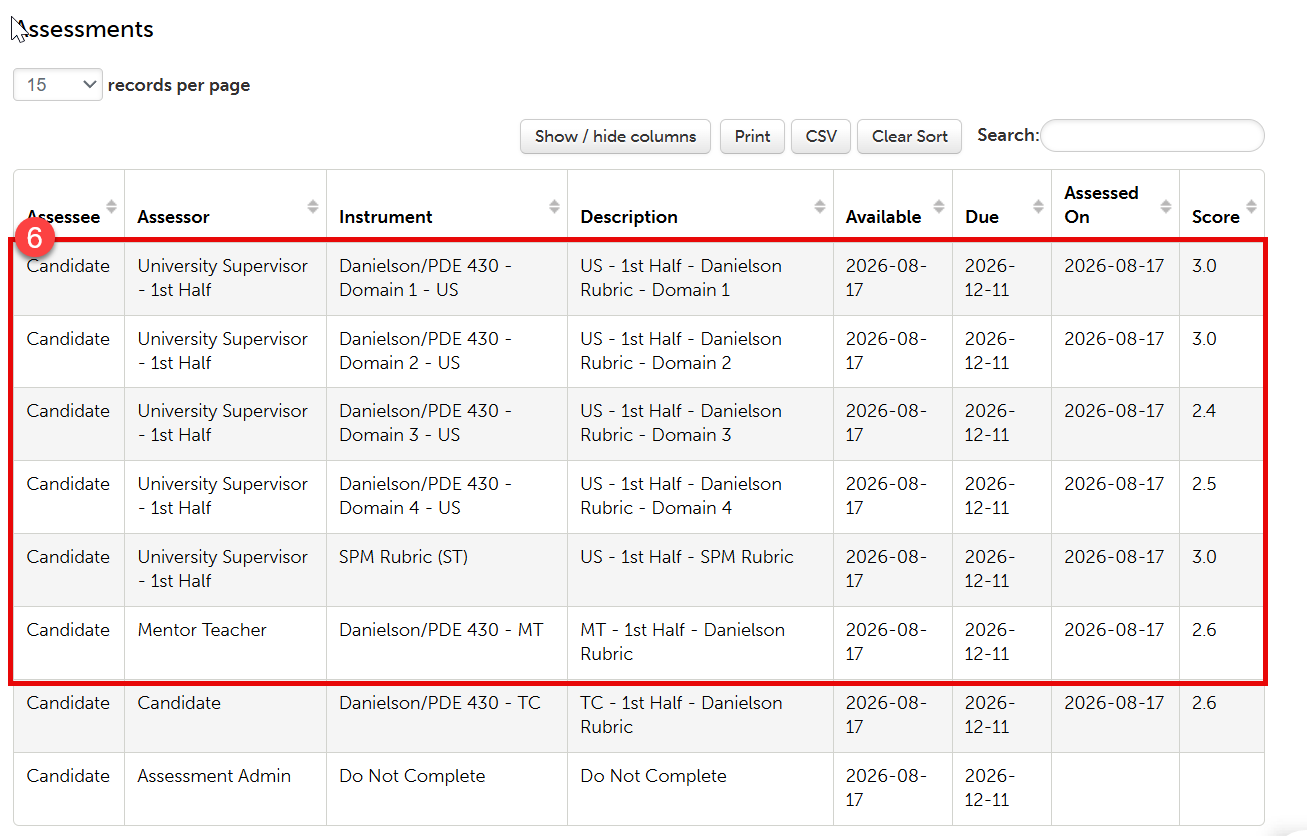
Scroll to the section of the placement that lists all the assessments. If your University
Supervisor and Mentor Teacher have completed their assessments of you, you will notice
that there are now mean scores associated with each item. You can view the mean score
in the “Score” column.
- To review how you were scored on each individual criteria of a rubric, click on the
name of that assessment. Then, when a menu appears, click “View Summary”.
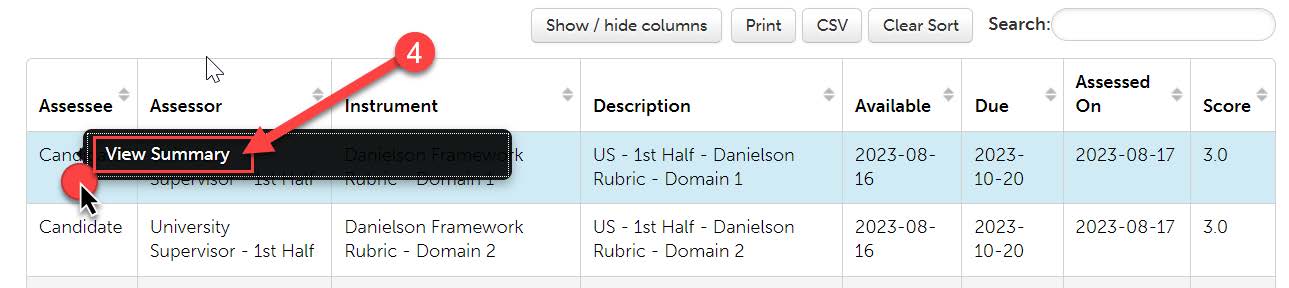
- You will be able to view the details of the rubric scores here.
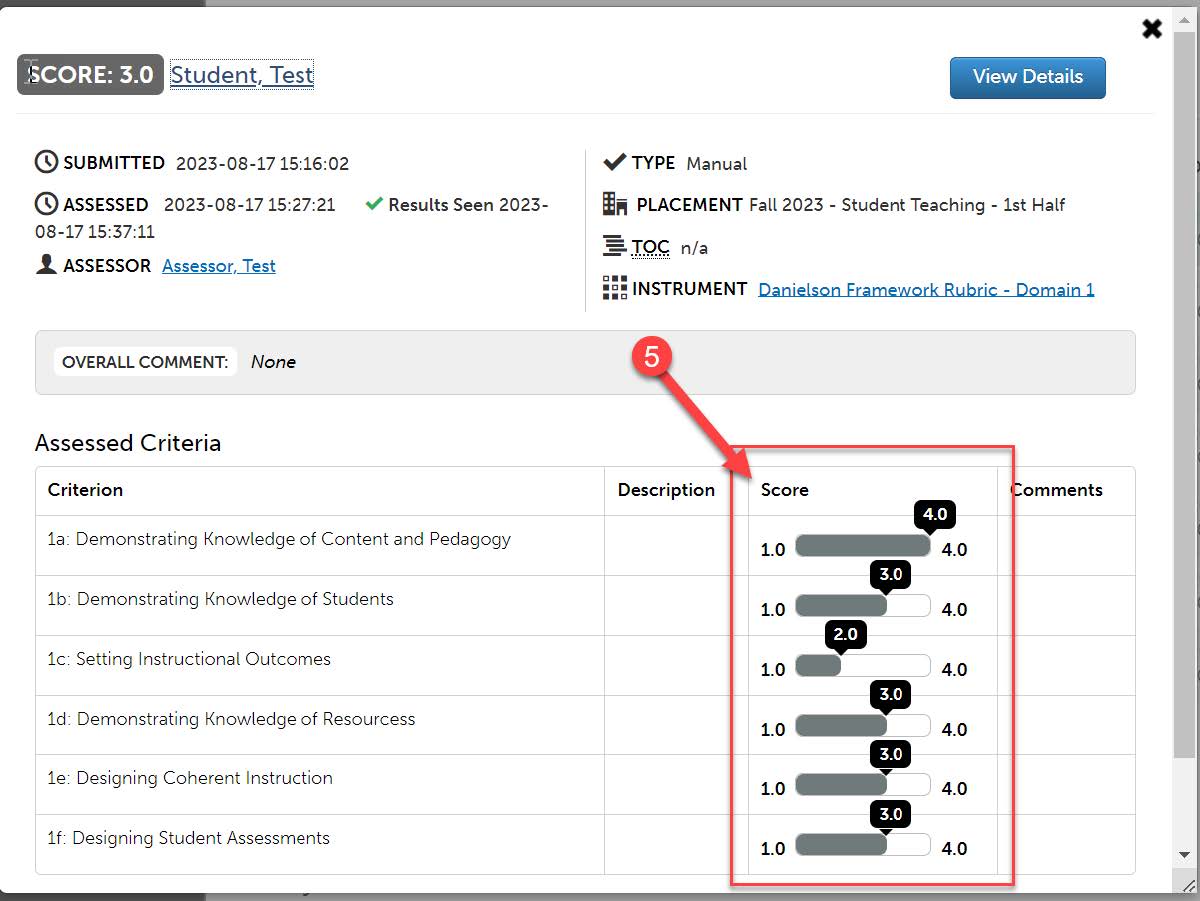
- You should review your scores for all of the Danielson Rubrics (Domains 1-4) that
were scored by your supervisor, the Danielson Rubric that was scored by your Mentor
Teacher, and the SPM rubric that was scored by your supervisor.
- Once you have reviewed your scores, navigate back to your student teaching portfolio.
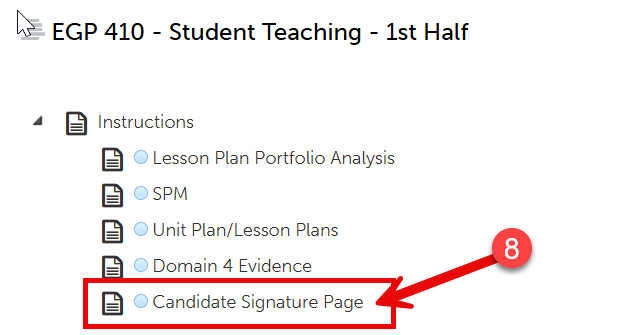
- Click on “Candidate Signature Page”.
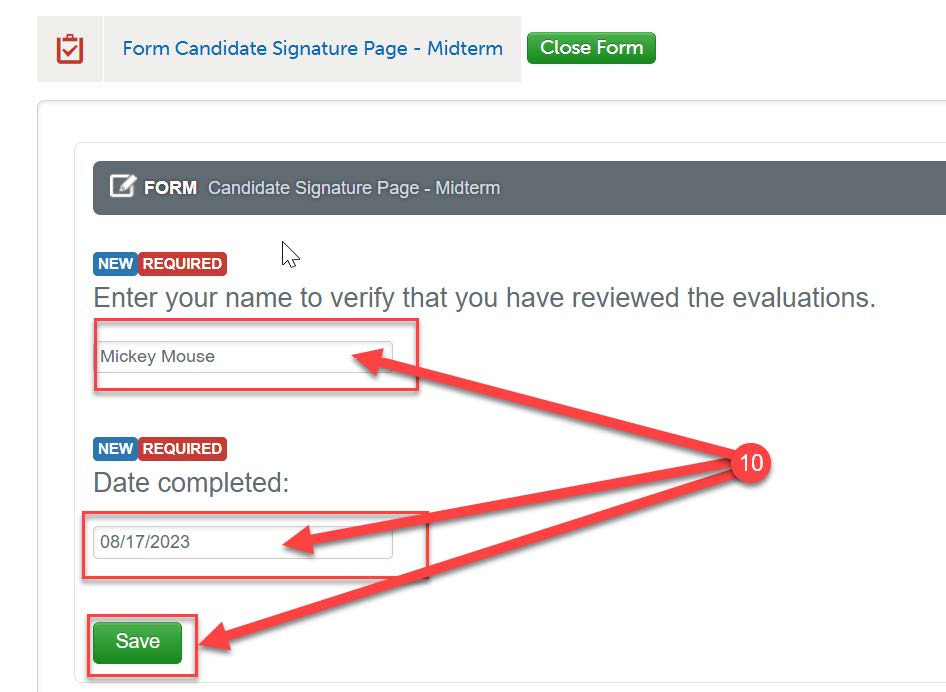
- Click on the “Candidate Signature Page” form below the instructions.
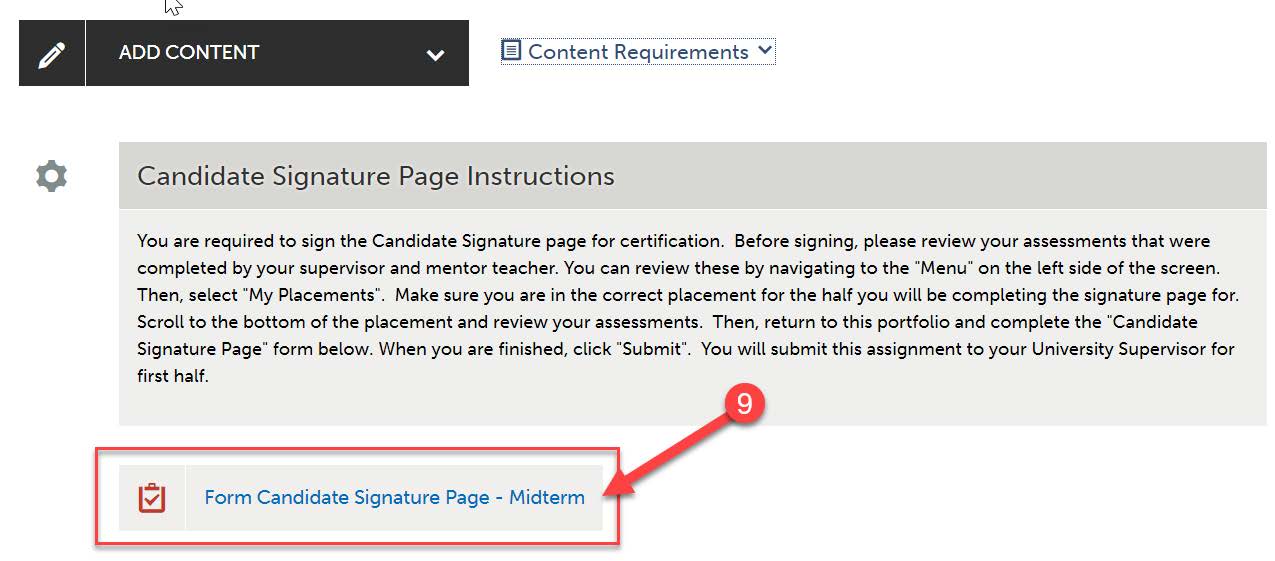
- Complete the “Candidate Signature Page” by providing your digital signature (typing
your name) and selecting the date that you are signing. Click “Save” at the bottom
of the form.
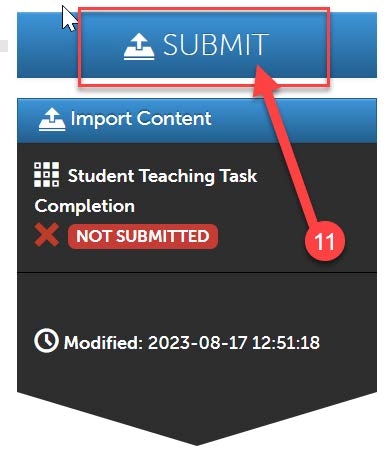
- Click “Submit” at the top of the page.
- Navigate back to your student teaching portfolio to complete the any other requirements.
Other Student Teaching Assignments
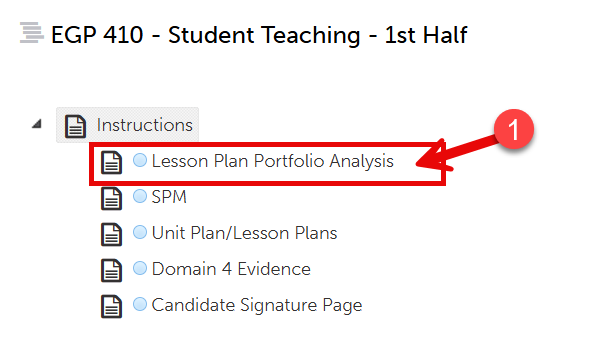
- Depending on your program, there may be other required assignments in your Student
Teaching Portfolio. For example, in the screenshot below, Mickey Mouse is in the Early
Grades program which has a requirement to submit an assignment called the “Lesson
Plan Portfolio Analysis” in their student teaching portfolio. Check your portfolio
to see what other assignments, if any, you are required to submit.
- If there are additional assignments, please follow the instructions on each tab to complete the assignment.
- If there are no additional assignments, you are finished with your student teaching portfolio!
- Don’t forget that you have a student teaching portfolio and placement for each half of student teaching (if you are student teaching during 2 halves).